Getting Started Guide: |
Chapter
4 |
Using the Inspector pane |
|
|
CHAPTER
CONTENTS
|
View and edit properties of the current Project, the current diagram, or selected diagram elements (nodes, links, members, etc.) | |
Show or hide different types of elements in a Class diagram | |
Enter and edit comments in source code | |
Create and browse hyperlinks between diagrams, diagram elements and other diagrams, or between diagrams (or elements) and disk files | |
Apply changes to the above. |
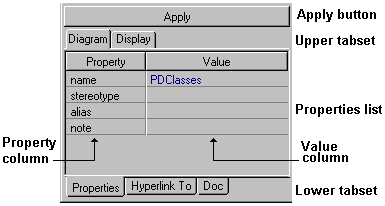
Figure 4.1. Inspector pane components |
Changes you make in the Inspector don't take effect until you click the Apply button. The upper tabset is only visible when you select the background of a Class diagram. It has two tabs as shown. The Properties list displays the properties, and current property values of the selected diagram element, or the diagram itself if no element is selected. The Property column displays the names of properties. The Value column displays the value of each property, which you can edit. The lower tabset is always visible, but its composition varies depending on what is currently selected in the Diagram pane and/or the upper tabset.
The Properties tab displays the properties of a selected diagram element (or the diagram itself if no visual elements are selected). For more information, see Editing Properties. | |
The Hyperlink To tab enables you to link the current diagram, or a selected diagram element, to a new or existing diagram or to a disk file. For more information, see Using the Hyperlink To Tab. | |
The Doc tab enables you to enter comments for the source code declaration of a selected Class diagram element without leaving the diagram. For more information, see Using the Doc Tab. |
Tab name... | When visible... | Displays... |
Link | a) When a link icon is selected in the Diagram pane. | Link attribute properties (as opposed to properties of the visual link element). |
b) When the Display tab is active in the upper tabset. | View settings for links. | |
Class | When the Display tab is active in the upper tabset. | View settings for Classes. |
Attribute | When the Display tab is active in the upper tabset. | View settings for Attributes. |
Operation | When the Display tab is active in the upper tabset. | View settings for Operations. |
Figure 4.2. The lower tabset becomes scrollable if tabs are hidden |
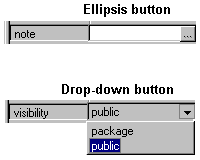
Clicking an ellipsis button leads to a modal dialog box with appropriate edit controls for the selected property. | ||
Clicking a drop-down button displays a drop-down list of valid values. | ||
Figure 4.3. Accessing optional property editors |
In the Diagram pane, select the element to edit its properties. (If you select nothing, the background is selected by default and the Inspector displays Diagram properties.) | |
To modify a property, click on it in the Inspector. Note that some properties are not modifiable with the Inspector and are therefore disabled for editing. Note also that some diagram elements, such as compiled classes, are read-only and therefore not modifiable. | |
Changes to property values display immediately in the Value column but are not applied to the diagram until you click the Apply button, choose Update Diagrams from the Diagram context menu, or click on a different pane. | |
You can edit the name property of Class and Interface nodes and Members "in place" on the diagram icon itself. (See User Guide, Chapter 1. Diagram Basics). | |
If you change the scope or visibility of a Class (e.g., from Public to Package), you should use the Update Diagram command on the Diagram context menu rather than the Apply button. | |
The name property of many diagram elements can also be edited in-place directly on their icons. Click once to select the label, then again to activate editing. For Class and Interface members (i.e. Attribute, Operation), you can enter only the name identifier or the full declaration (syntactically-correct for the project's target language). |
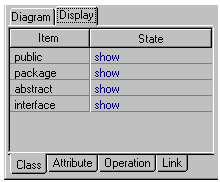
You control the hiding and showing of diagram elements from the Display
tab on the upper tabset of the Inspector. When
the Display tab is active, the lower tabset displays tabs for the different
categories of elements you can choose to show or hide in the diagram (see
Figure 4.4).
Figure 4.4. The Display tab and element category tabs in the Inspector. |
You can customize the view of class members using the Diagram tab of the Diagram Options dialog. Right-click the diagram background and choose Diagram Options from the context menu. Control the Details level and Formatting style to alter the presentation of such parts of members as the type, name, and operation parameters.
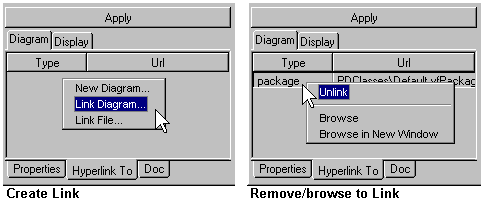
Figure 4.5. Access Hyperlink operations from the Hyperlink To context menu. |
You can create a new diagram in the Project and simultaneously create a hyperlink from an existing diagram or element. When creating the hyperlink, choose New Diagram on the context menu and specify the Package, name, and type for the new diagram in the resulting dialog box. | |
When you browse to a linked file, it opens in the application for which the file type is registered. For example, a .html file would open in your Web browser, or a .doc file in your word processor. | |
To browse to a linked diagram or file, right-click directly on the tab part of the Hyperlink To tab page to display the context menu. |
To enter a comment about a Package or Diagram:
To enter comments in source code:
GO TO TOP | CHAPTER 5 | CONTENTS | USER GUIDE | HELP CONTENTS |