Together User Reference:
 
Dialogs 
Reference
Options dialog
DIAGRAM TAB    CLASSES TAB    LAYOUT TAB    PRINT TAB    CODE EDITOR TAB    TOOLS TAB

You can call the Options dialog from the main Edit menu (Global options...) or from the Diagram context menu (Diagram options...). Depending on the way it is called, the dialog has the corresponding title and set of tabs and buttons. It has corresponding effect: for a diagram options or for global options. For details, see Getting Started: Chapter 5. Configuring Options. The dialog displays several tabs, each corresponding to a category of options. The options are described below independently of the dialog scope.

Diagram tab

 
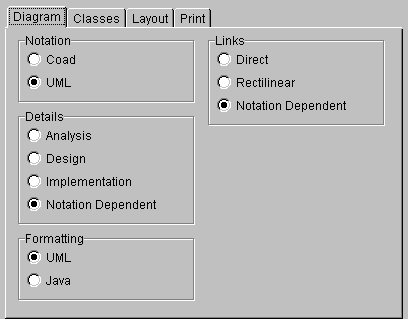
Notation 
  • Coad - use Coad notation in diagram(s)
  • UML - use UML notation (default)
Details 
  • Analysis - names only
  • Design - names and types
  • Implementation - names and types, parameters for operations, initial values of attributes
  • Notation Dependent (default)
    • UML - design

    • Coad - analysis
Formatting 
  • UML (default)
    • Operations... name (parameters) : type 
      Attributes... name : type
  • Java
    • Operations... type name (parameters) 
      Attributes... type name
Links 
  • Direct - always draw links direct
  • Rectilinear - always draw links rectilinear
  • Notation dependent (default)
    • UML - Direct

    • Coad - Rectilinear
 
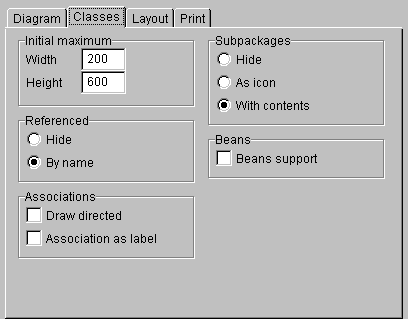
Figure 1. Diagram tab
TOP

Classes tab

Initial Maximum 
These values determine the maximum width and height of a class when a diagram is initially created. When a classname (which may have a leading package name) is shortened it is displayed right aligned with three leading dots. 

Classes can be manually resized later. 

  • Width - initial maximum width of class
  • Height - initial maximum height of class on creation
Referenced 
  • Hide- names of referenced classes are not displayed in the diagram.
  • By name - when a class extends some other class that is not shown in the diagram, the name of the extended class is shown right-aligned under the name of the extending class. 
Associations 
  • Draw directed - draw an arrow to show direction of the association.
  • Association as label - show Attributes which are displayed as link and have the automatically generated prefix "lnk" additionally as label in the class.
Subpackages 
  • Hide - don't display subpackage icons in the diagram
  • As icon - show subpackages as package icon
  • With contents (default)- show subpackages as package icon and a list of all classes and interfaces within the package
Beans 
    Beans support - when checked, classes which conform to Beans naming conventions of members are displayed with a bean icon. Additionally, properties will be displayed in a additional properties section below the operations section. 

    (This option only appears if the product version you have supports Java)

 
Figure 2. Classes tab
TOP

Layout tab

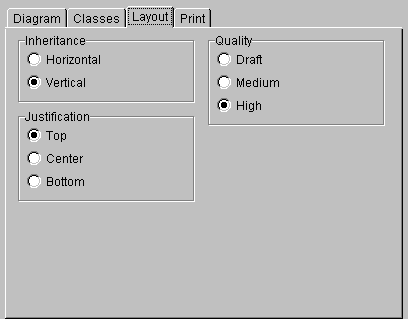
 Inheritance 
  • Horizontal - classes connected by inheritance link are aligned horizontally
  • Vertical - classes connected by inheritance link are aligned vertically
Justification 
  • Top - classes placed horizontally in the same row are aligned to top in this row
  • Center - classes placed horizontally in the same row are centered in this row

  • Bottom - classes placed horizontally in the same row are aligned to bottom of this row
Quality 
  • Draft
  • Medium

  • High (default) 
 
Figure 3. Layout tab
TOP

 Print tab

Here you can setup the page size, orientation, margins and options. 

Paper size 

    Same choices as available in Windows Print Setup.
Margins 
    Numbers are applied according to scale currently specified in the operating system printer setup (inches, centimeters, etc.)
Options 
  • Fit to page - print diagram in a single page
  • Bounding box - print a border box around each page. The border matches the margins that are set up
  • Print footer - prints the page number at the bottom of each page
  • Print empty pages - prints pages that have no content
  • Show print grid - shows gray gridlines in the diagram and overview window, these represent the page margins.
  • Print zoom - this is the zoom factor for printing (e.g., 1:1, 2:1, etc.) Think of the default value 1 as 100%. Thus, entering 2 here causes diagram to print at 200%, while .5 prints it at 50%, and so forth.
 
Figure 4. Print tab
TOP
 

Code Editor tab

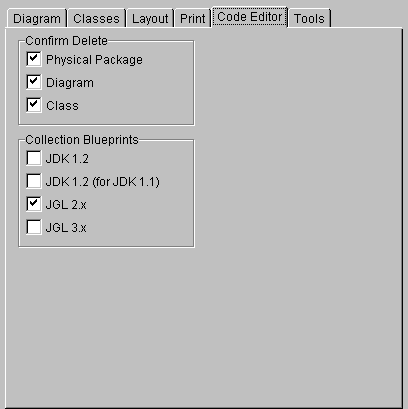
Confirm delete: 
Optionally display confirmation dialog when physically deleting a class, package or diagram. Delete confirmation is enabled for all elements by default. 
  • Physical Package: Confirm before deleting a package
  • Diagram: Confirm before deleting a diagram
  • Class: Confirm before deleting a class
Collection Blueprints: 
Select which sets of collections (containers) to include in the Choose Pattern dialog. The default configuration file contains 4 sets of blueprints for creating links implemented as collections for various libraries. Check those collections you work with. This enables to decrease the list of patterns in the Choose Pattern dialog. This version of Together has the following collections: 
  • JDK 1.2
  • JDK 1.2 for JDK 1.1
  • JGL 2.x (default)
  • JGL 3.x
However, you can edit ./lib/config.properties file, adding new blueprints and editing the existing ones. Then your blueprints will display in the Choose Pattern dialog and you can use them to choose implementation of links. 
 
Figure 5. Code Editor tab
TOP

 Tools tab

You can use this tab to create commands on the system context menus of different types of Together icons: diagram elements, files and packages. These commands launch other applications (i.e. Tools). Elements that are components of diagrams append Tools commands to the context menu of the corresponding icon. Elements that are represented on the Navigation pane's project tree append Tools commands to the context menu of corresponding tree-view nodes (e.g., Source files).

Note: This tab only displays when the Options dialog is invoked with Edit | Global Options. It is not present when the dialog is called from the Diagram context menu.
 

Tool launch command(s) for: 
A drop-down list of elements that have context menus on which you can create additional commands that launch other applications. 
Selections: 
    • All - Any kind of items that may have a tool context menu
    • Editable - Any editable element: Source file icons in the Navigation pane, Class and Link icons in diagrams, Attributes and Operations in Class icons
    • Diagram item - Diagram elements: Class icons, Attributes and Operations in Class icons, and Links
    • File - File icons (including Diagram files) in the Navigation pane and Class icons in diagrams
    • Directory - Directory icons in the Navigation pane and Package icons in diagrams

    •  
Current command(s): 
The list of Tools (i.e. other applications) currently established on the context menu of  the item selected in Tool launch command(s) for. The order of commands in the list matches one in the context menu. 
 
Add: 
Add to the list of tools that the element in Tool launch command(s) for launches. 

Remove: 
Delete the launch command selected in Current command(s)

Move Up: 
Move current selection in the Tools list up one position. (Enabled if the list has two or more items.) 

Move Down: 
Move current selection in the Tools list down one position. (Enabled if the list has two or more items.) 
 

Label for context menu: 
You can rename here the command selected in the Tools list. This name also appears on the context menu of the item selected in Tool launch command(s) for

Command: 
The operating system command required to launch the Tool. Include full path if necessary on your system. Use the ellipsis button to browse for the desired executable or other command file. 

Parameter(s): 
Command line parameters passed to the command specified in Command
Use macro parameters to specify the information about the item for which the context command is being launched. For example, specify $FILE_SPEC$ to pass the source file path of the item as parameter. 
This edit box has a right-mouse menu that enables you to select one of the supported macros. For information on the Tools' macros and the Parameters context menu see User Reference: Parameters Context Menu. 
 

Apply output management: 
Some console tools (especially batch or command files) can't be started directly. Together provides a  special OS-dependent output management tool oistart that starts such programs correctly. It also catches program output and writes that to a file. 
(Note: this option appears in some builds as "Use oistart")
Caution: Checking this option is necessary for reliable tool output under Windows. When you uncheck it, a warning message displays. 
You can disable this message by specifying 
options.tools.warning.disable_oistart = no  
in config.properties. 
 
Wait and Update: 
Diagrams are updated after the tool operation is complete. Enabled only if Use oistart is checked. 
Caution: External tools can perform modifications of the source code (e.g., revision control commands). Checking this option makes you free from manual invoking Update All diagrams.
Console Tool: 
Specifies that the Tool is a console application and its output is redirected to the Message Log window (see Getting Started: About the Main window). Enabled only if Use oistart is checked. 
Caution: This option should be used with care - if a tool waits for user input or if it is a GUI application (Windows, PM, Motif, etc.) the option should not be checked. If it is, the tool waits but you can't see the prompt so it seems like the tool hangs. 
Also note that some console applications may use a non-standard output device. In this case, the output can't be captured to the Message log.
 
Figure 6. Tools tab
 

Interacting with Version Control Systems

The external tools feature enables you to integarate with a version control system (VCS) such as MS Visual Source Safe or PVCS. By setting up appropriate tools commands, you can configure Together to interact with a VCS to create projects, add or delete files, check files and directories in or out, etc.

Together provides two sets of batch files to help you quickly set up commands for either MS Visial Source Safe (vss*.bat) or PVCS (pvcs*.bat). These files are installed to the bin directory.

To set up VCS interaction, you can call these batch files on the Command line, passing appropriate macros, described above, as paramaters .
See the readme_vss.txt or readme_pvcs.txt file in the bin directory for info on order of parameters.

If you use a VCS other than MS Visual Source Safe or PVCS, you can use the files supplied with Together as a starting point and edit them as needed to adapt to your VCS.
 

TOP 


GO TO TOP USER REFERENCE USER GUIDE GETTING STARTED HELP CONTENTS
© 1997-98
 

This page is hosted by the Chair for Applied Software Engineering of the Technische Universität München.
Imprint (Impressum)